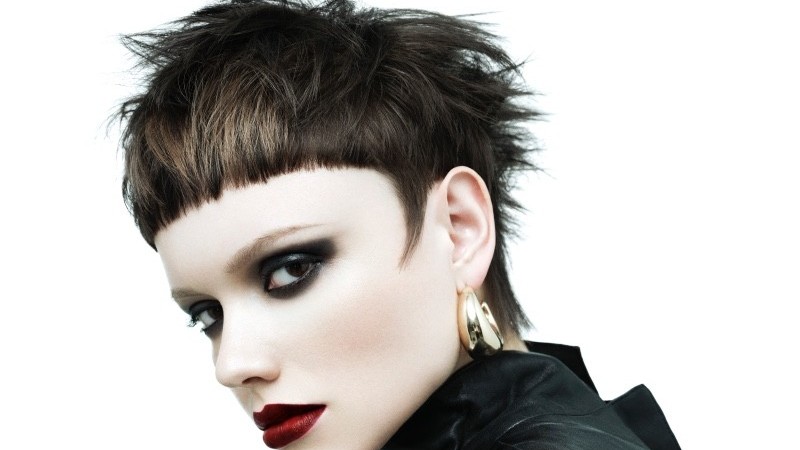
The pixie cut is a timeless hairstyle that adds sophistication, edge, and versatility. Nestor Sanchez from the award-winning HOB Academy breaks it down in this step-by-step to achieve a modern, flattering pixie. Follow this guide to master the cut, texturising, and styling techniques that make the pixie a standout look for any hair type.
Step 1: Section the Hair for Precision Cutting
Section the back away from the front with a section that travels from the crown to behind each ear. Then create a horseshoe section on top of the head.
Step 2: Cut the Side Sections
Now start by cutting a square layer on the side sections making sure the sideburn area remains longer (for personalising and detailing once the hair has been dried).
Top Tip: These areas will remove weight from the sides giving this pixie cut a slimmer modern look.
Step 3: Layer the Top Section
Now choose the optimum length for the top and cut a square layer to remove internal weight whilst creating corners on the roundness of the head.
Top Tip: This is to retain some weight to later create a fringe with a strong perimeter.
Step 4: Shape the Back
To start the back, take a central profile section that travels from the crown to the bottom of the nape. The guide for this section comes from the crown. Layer the profile section square projecting the sections 90 degrees out from the head.
Top Tip: This method of cutting allows us to remove weight from the centre of the head, whilst keeping the feeling of length around the nape perimeter.
Step 5: Dry the Hair Properly
Dry the hair with a Vess brush using a wrapping motion around the head to smooth and make sure the hair sits in its natural fall.
Top Tip: Use a Hydrating Lotion Spray with Light hold to control the hair and most importantly, the roots, throughout the drying process.
Step 6: Texturise for a Modern Feel
Now texturise the hair to add a softer/vintage feel to the style. This will give the hair a very airy and cool texture.
Step 7: Cut the Framing Fringe
The last step is to cut a framing fringe that travels from ear to ear, revealing every feature and bone structure on the face. Elevate the fringe out 90 degrees and holding the hair through the comb, blunt-cut it with the texturizing scissors to achieve the strong yet gentle feel on the outline.
Step 8: Finish and Style
Style the hair with some Matte Clay, rubbing a small amount into the roots and fix the style in place with a light touch of Hairspray.
Hair By HOB Creative Team, Artistic Team of the Year 2025