Get the look: classic men's cut by dale ted watkins
Published
19th Nov 2013
by rachael


Dale Ted Watkins men’s haircut is a high and tight graduated shape with disconnection, featuring scissor and clipper-over-comb techniques.
The final result is a classic male shape incorporating the rudiments of male grooming and methodical technique, borrowing elements of yesteryear. The shape references the essence of the college elite, sporting heroes, matinee idols, military style and the Rat Pack. Find out how to get the look, below!

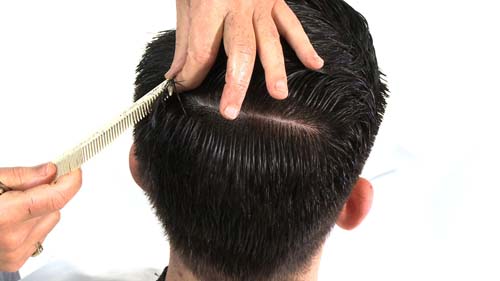
 2. Take a horizontal section on the left-hand side along the parietal ridge. This will be the initial guide for the internal side shape. Create a clean section and pull the hair to approximately 45-degrees to the head. Work this guideline back to the round of the head. Once you reach the back of the head shape, maintain the square line and don’t follow the head shape.
 3. After establishing the initial guide, work from the top down with a clipper-over-comb technique using a standard clipper without a guard. After establishing the initial guide, work from the top down with a clipper-over-comb technique using a standard clipper without a guard.
 4. Continue this process in the side to the round of the head graduating to the top guide and keeping the angle square. Repeat the same process on the second side, again establishing a guide on the parietal ridge and maintaining a square cutting line and correct elevation.
 5. Work with horizontal sections, connecting the top right-hand side to the initial guide underneath. Pull all the hair to the initial guide with a small amount of elevation and cut a square line.
 6. Re-section along the parietal ridge on both sides and through the crown to isolate the top oblong shape and to next work on the back panel. Establish a guide on the round of the head, elevating to approximately 45 degrees and cut a square line to the head.
 7. Repeat the clipper-over-comb technique working from the top down, placing the guide with the back of the comb, working the clippers along the spine and ensuring a square shape. Connect the side and back corners.
 8. Once you have established the internal shape from where the head rounds from the parietal ridge all the way round, work with the clipper-over-comb blending from the perimeter outline and working closely to the guide. Constantly assess the shading to accommodate the head shape. Having established the shape in the back, refine the clipper work from the perimeter up.
 9. Work on the parting on the right-hand side just in front of where the head rounds with a horizontal section. Elevate to 90 degrees and cut a square line. Continue with parallel sections working forwards, with clean sections and maintaining the guide.
 10. Work from the initial guide in the top, take a vertical section parallel to the parting and connect the top to the back following the head shape. Continue the same process across the head.
 11. Dry the hair to assess the natural texture including the swell. Further refine with a small set of clippers and the flexible barbering comb. Apply a heavy wax product for a sleek look, comb through and refine the grooming.
www.myhairdressers.com Step by step images: Jamie Harrison Final images: Ross Kirton

